Your model looks fine on screen, but the slicer shows gaps in the walls, skips layers, or refuses to slice the file at all. A common cause is flipped normals: some triangles of the mesh face inward when they should face outward. In an ordinary shaded view those triangles look the same as their neighbors, so the problem stays hidden until you try to print.
The Normals view mode in STLViewer makes it visible. It colors every surface by the direction that surface faces, so a triangle that faces the wrong way gets a different color and stands out. It works with STL, 3MF, and PLY files, and everything runs in your browser.
What is a normal?
A 3D model for printing is a shell made of flat triangles. Each triangle has two sides: one faces the outside of the part, the other faces the inside. The normal is an imaginary arrow that sticks straight out of the triangle on its outer side. It is how software knows which side is which.
Nobody draws that arrow by hand. Software works it out from the order in which the triangle's three corners are listed in the file. An STL file also stores the arrow as three numbers next to each triangle. For more about the format itself, see What is an STL file?
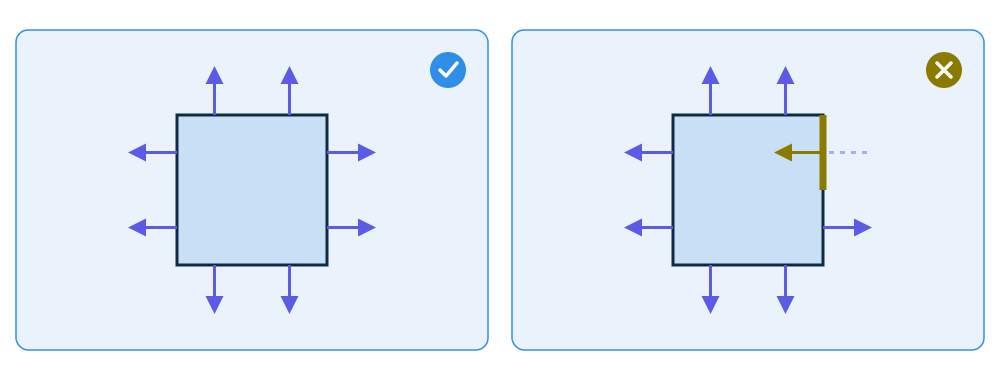
When every arrow points outward, a slicer can tell where the material is. A face whose arrow points inward is flipped. The slicer may read that spot as a hole, leave a gap in the wall, or report that the model cannot be printed. Flipped faces usually appear after mirroring a part, after joining meshes made in different programs, in 3D scans, or after a faulty export.
They are hard to notice because most viewers, including the Solid mode in STLViewer, draw both sides of a triangle the same way. That is convenient for looking at a model, and it is also what hides a face that points the wrong way.
Step 1 — Open your model
Go to stlviewer.online and drag your STL, 3MF, or PLY file onto the page. The model opens in the viewer right away. You do not need an account, and the file stays on your device: nothing is uploaded unless you later decide to share the model.
Step 2 — Switch to the Normals view mode
The first group of buttons in the viewer toolbar switches the view mode: Solid, Wireframe, X-Ray, and Normals (the rainbow icon). On a narrow screen only the icons are shown.
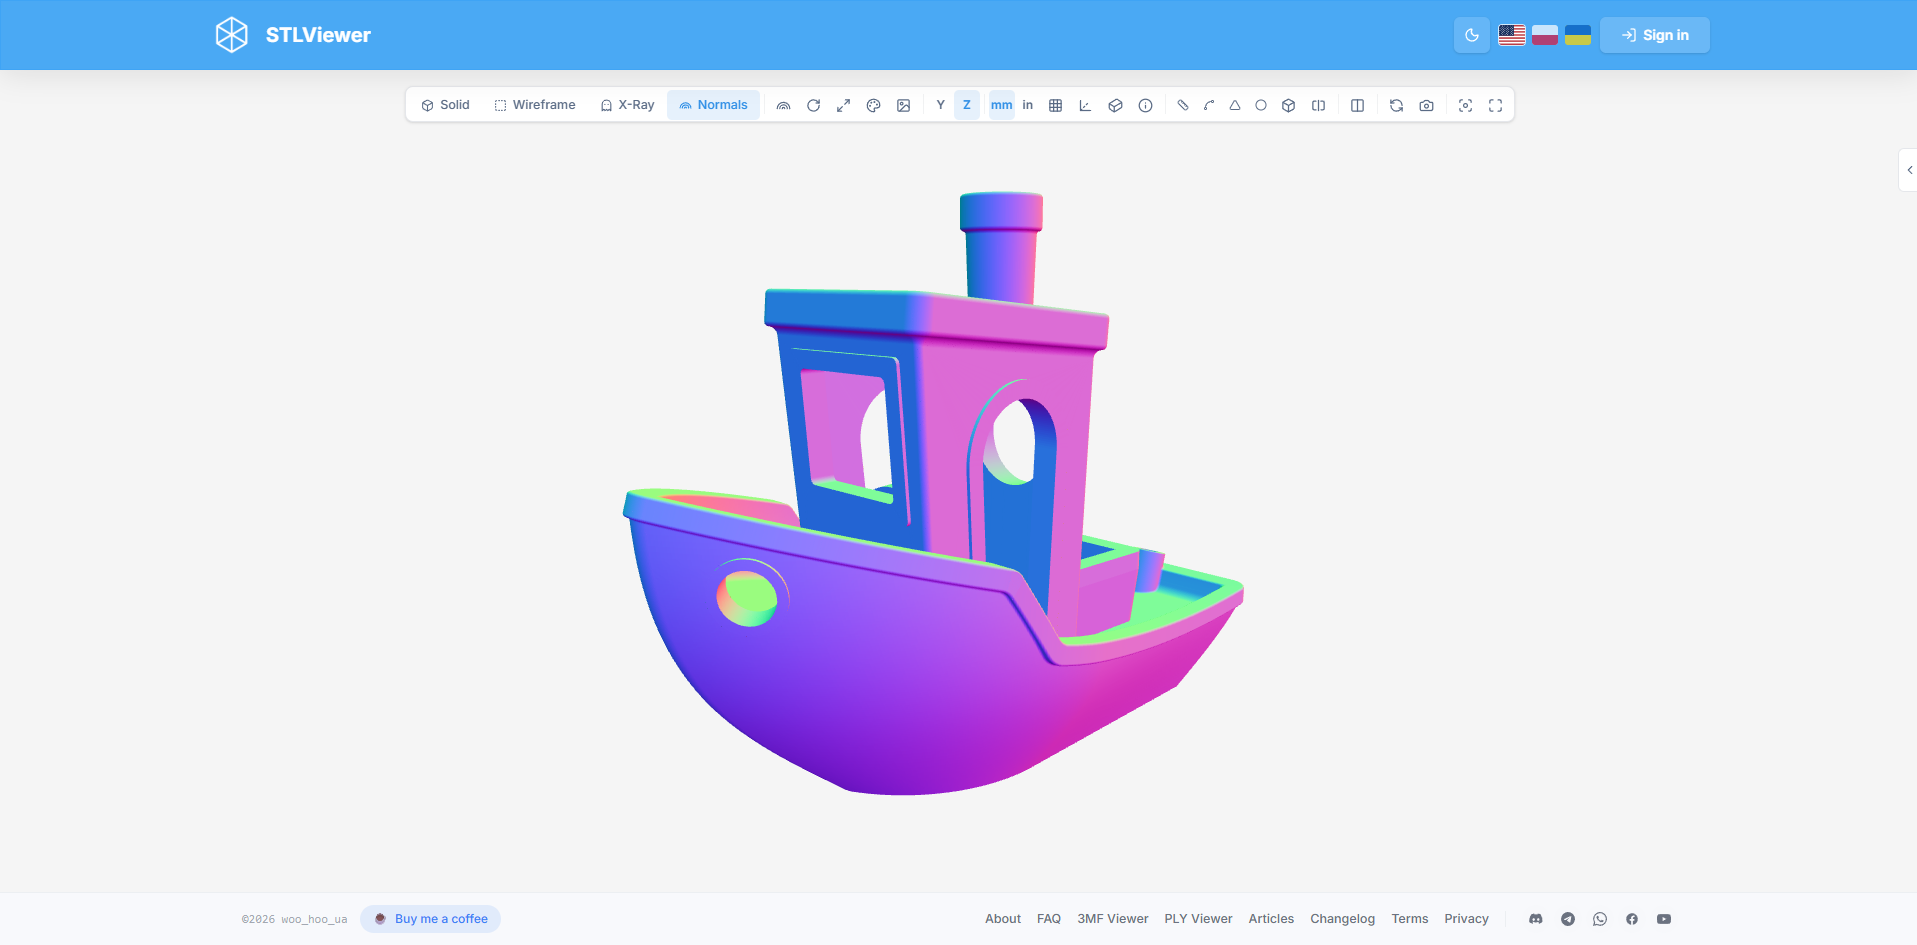
Click Normals. The model's material is replaced by bright colors: mostly blue and violet, with pink, turquoise, and purple toward the edges.
Two things are different in this mode:
- Lighting is ignored. The color of a surface depends only on its direction, so there are no shadows and no highlights.
- The lighting button is replaced by the Normals options button. It also has a rainbow icon and sits right after the view modes. It opens the settings described in steps 4 and 5.
If Auto-rotate is on, turn it off. Colors are easier to judge when the model moves only when you move it.
Step 3 — Read the colors
The color tells you which way a surface faces. With the default settings, direction is measured relative to your screen:
| The surface faces… | Color |
|---|---|
| toward you | blue-violet |
| to the right | pink |
| to the left | blue |
| up | turquoise |
| down | purple |
| away from you | olive, dark yellow, orange, or dark green |
Surfaces in between get in-between colors, so a round shape looks like a smooth rainbow.
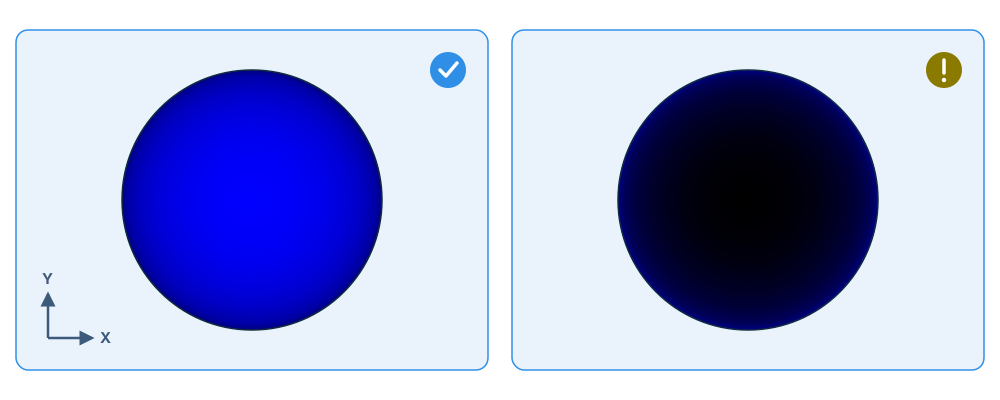
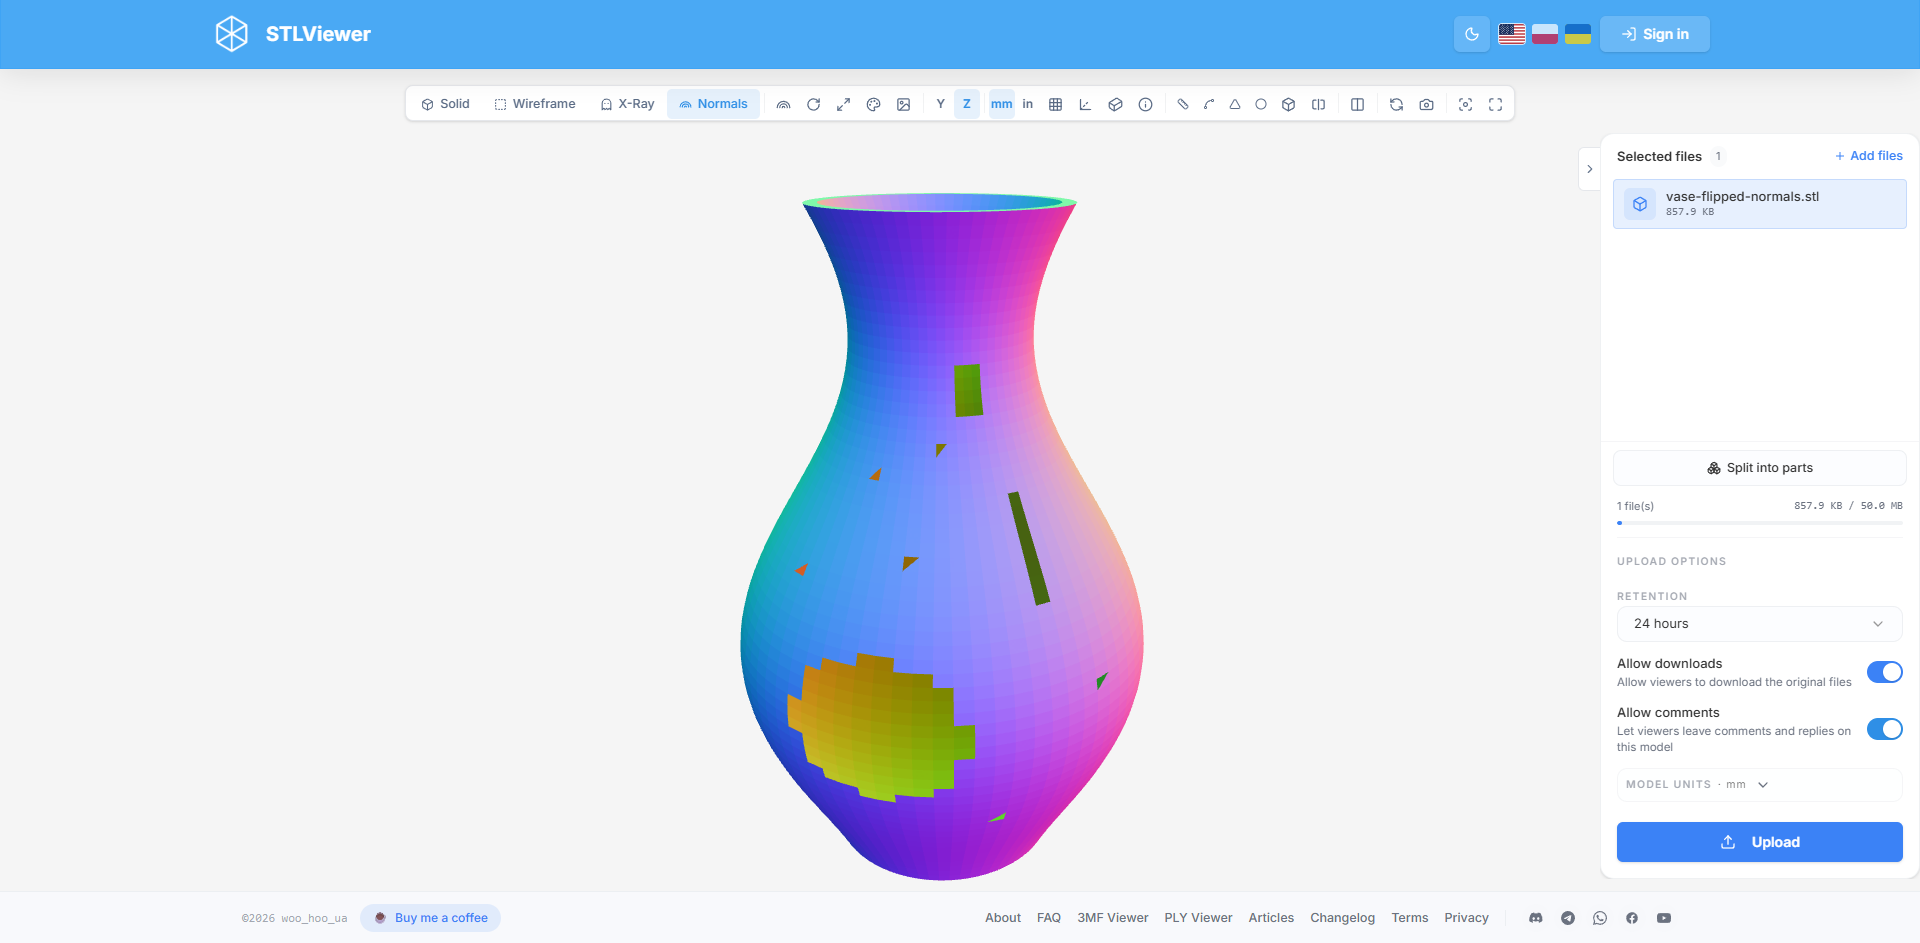
Flipped faces show up in the last row of the table. On a closed, healthy model you can only see surfaces that face you, so the whole model is drawn in the cool colors from the first five rows. A surface that faces away from you should never be visible. An olive, dark yellow, orange, or dark green patch is a surface seen from its back side, and on a solid part that usually means a flipped face.
To check a model:
- Rotate it slowly and look at it from every side, including the top and the bottom.
- Zoom in on small details, holes, and places where parts were joined.
- Look for patches whose color does not fit the surfaces around them. A flipped face is olive or dark yellow whenever it is turned toward you, while the faces around it are blue-violet.
If the whole model is olive and dark yellow, every face is flipped and the model is inside out. This happens after mirroring a part or scaling it by a negative value.
When olive is not a flipped face
Olive means "you are looking at the back of a surface". In a few cases that is expected:
- A hole in the mesh. Through the hole you see the inner side of the opposite wall. The faces are fine, but the hole itself is a problem worth fixing.
- A surface with no thickness, such as a raw 3D scan or a single sheet. From behind it is olive. Such a model has to be closed or thickened before printing anyway.
- A section cut. With Section analysis in Hollow mode you look inside the part, so the inner side of its walls is visible.
- The camera is inside the model. If you zoom in very far, you see the walls from the inside. Click Fit to get back out.
Step 4 — Choose the normal space: View or World
Click the Normals options button (the rainbow icon right after the view modes). The panel that opens has three parts: Normal space, Shading, and a Legend that sums up the color rules.
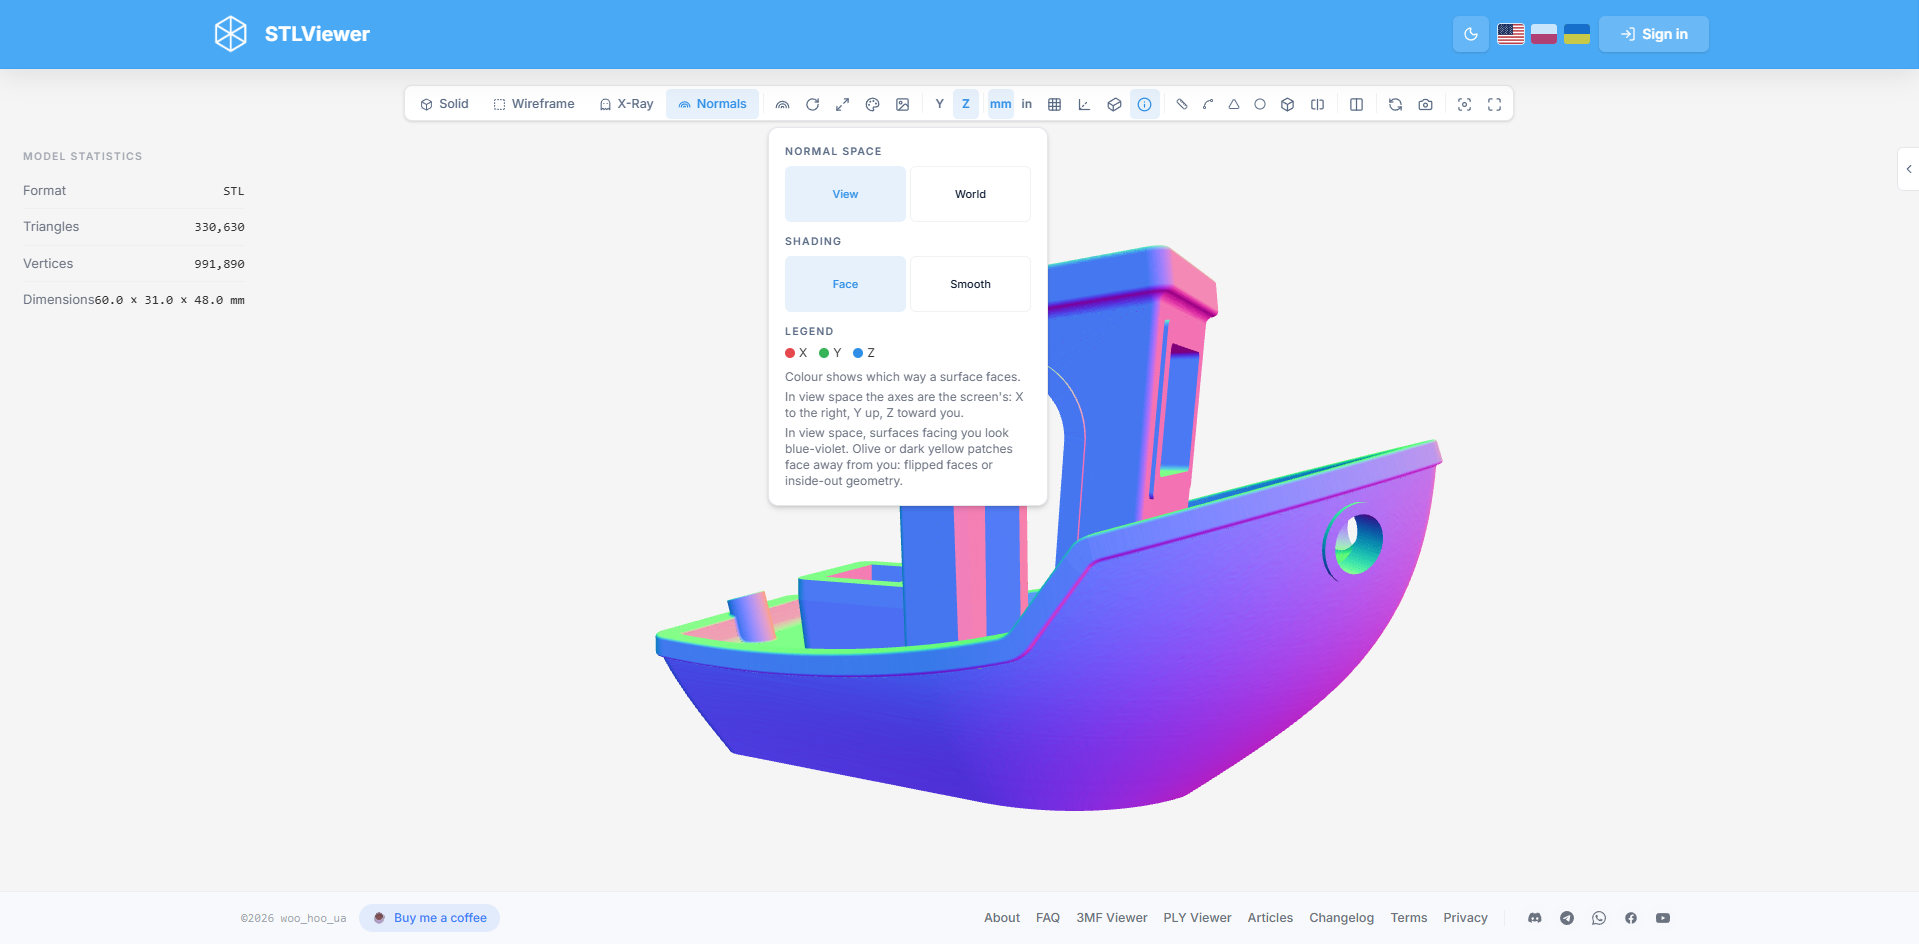
Normal space decides what a direction is measured against.
View is the default. Direction is measured against your screen: right, up, and toward you. The colors change as you rotate the model, because a surface that faced you a moment ago now faces sideways. Use View to look for flipped faces. From any angle, a surface that faces you is blue-violet and a surface seen from behind is olive.
World measures direction against the scene, which stays in place when you rotate the camera. Every surface keeps its color from any angle:
| The surface faces… | Color in World |
|---|---|
| up | light green |
| down | purple |
| one of the four sides | pink, teal, blue-violet, or olive |
Use World when you want colors that stay put: to see how a model is oriented, to find the surfaces that face down (the ones that may need supports if you print it this way up), or to take screenshots that are easy to compare.
Two things work differently in World:
- Olive is an ordinary color here. It marks one of the four sides, not a problem. In World a flipped face shows the color of the opposite direction, for example a purple triangle in the middle of a light green top surface.
- Up means up in the scene. If you switch the up axis with the Y-up and Z-up buttons, the model turns in the scene and its colors change with it.
Step 5 — Choose the shading: Face or Smooth
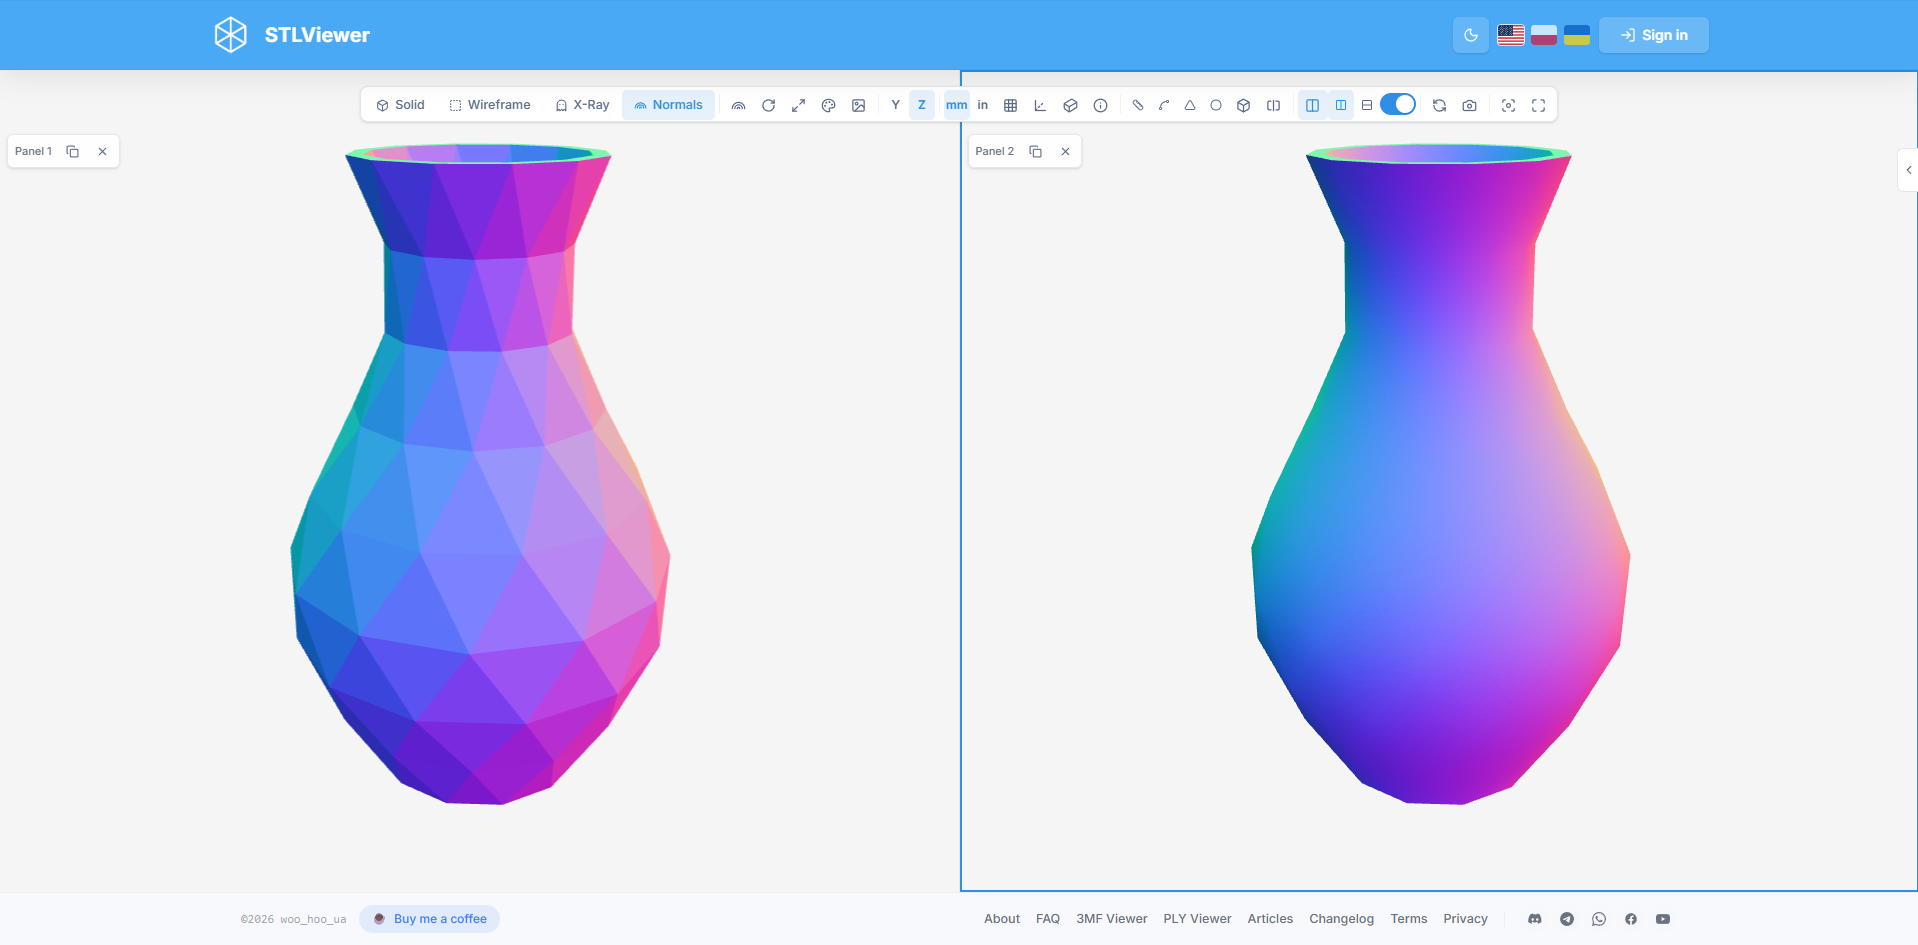
Shading decides where the direction of each surface is taken from.
Face is the default. Every triangle gets one flat color, and its direction is calculated from the triangle itself, from the order of its corners. Most slicers rely on the same information, so Face is the right setting for checking whether a model will print.
Smooth uses the normals that are stored with the model, the same ones the Solid mode uses for lighting. If the file contains normals, the viewer uses those. If it does not, it calculates them by averaging neighboring triangles, so curved surfaces usually get soft color transitions with no visible triangle edges.
For most STL files the two settings look identical, because STL stores exactly one normal per triangle. That makes switching between them a quick test:
- The picture does not change. The stored normals agree with the geometry. Nothing to do.
- Some patches change color. In those places the normals written in the file disagree with the order of the corners. Most slicers ignore stored normals, but some programs trust them, so it is worth exporting the model again.
- In Smooth the whole model turns one flat color. All normals in the file are zero, which is how some programs export STL. Slicers recalculate them, so this is harmless, and Face still shows the real directions.
Compare side by side in split view
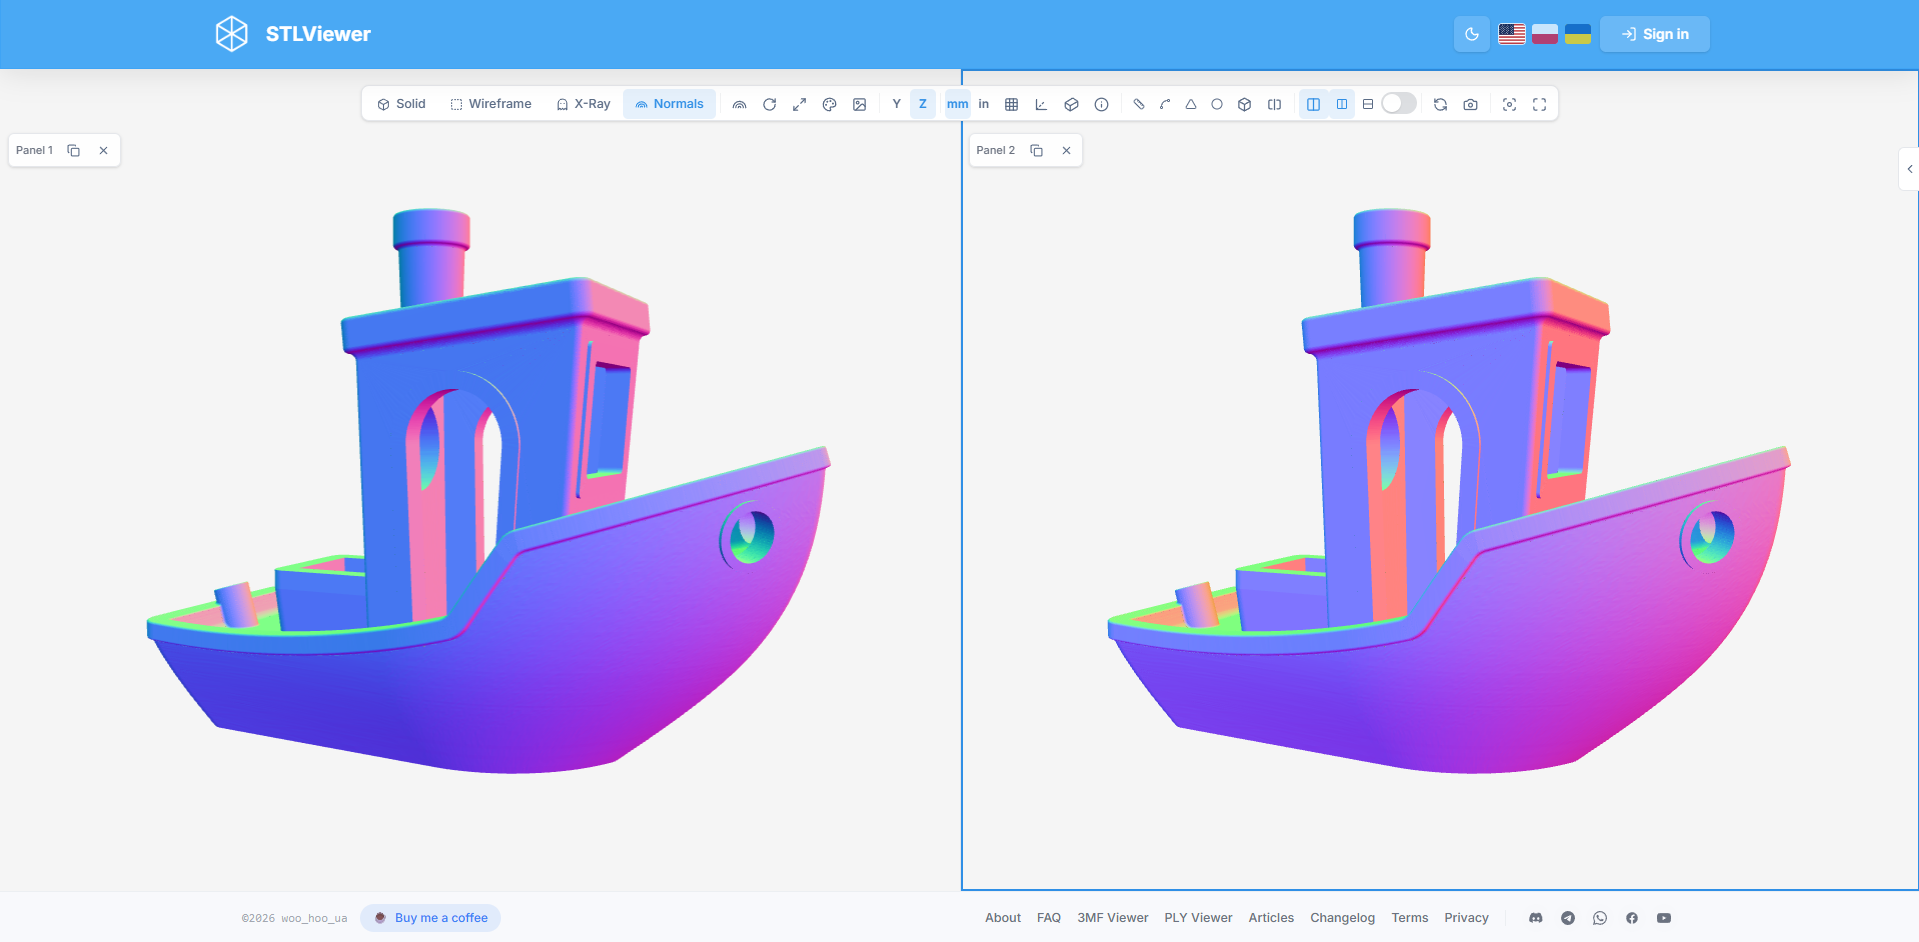
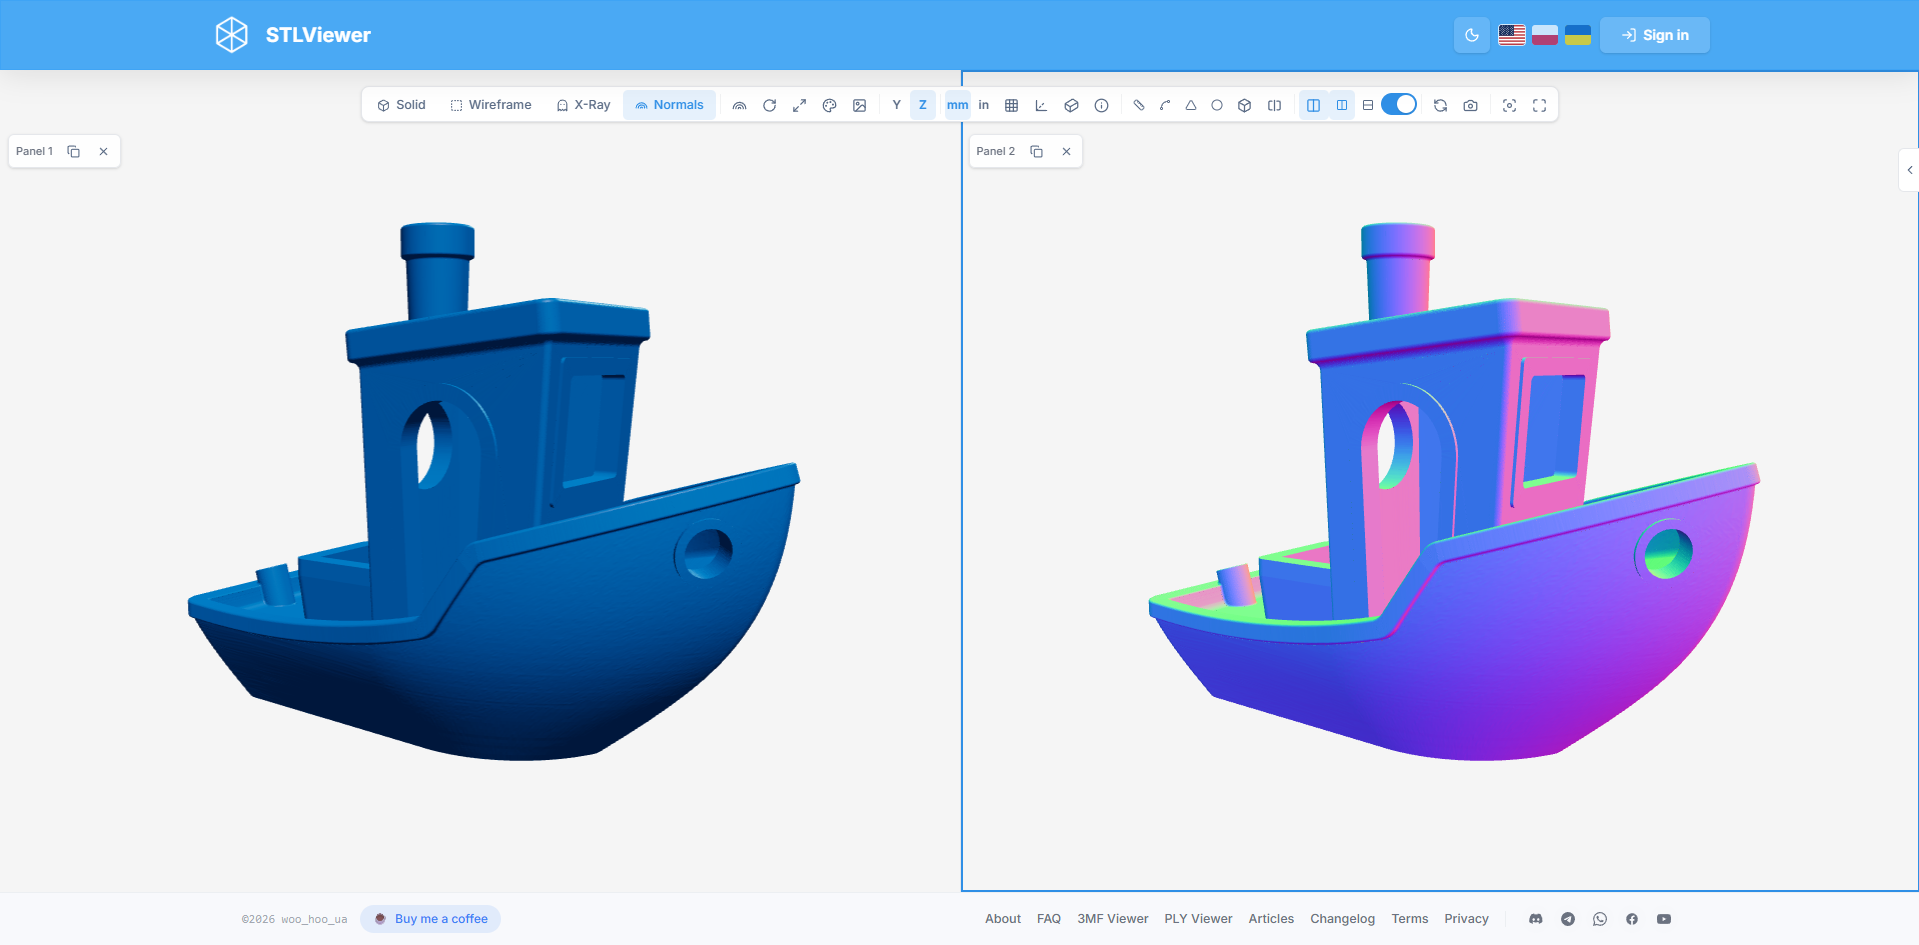
Split view shows two panels at once under one shared toolbar. It goes well with Normals, because you can keep the colored view and the regular view on screen together.
Click the Split view button in the toolbar. A second panel opens with the same model and the same settings. Two layout buttons (side by side or stacked) and a Sync views switch appear next to it.
How the panels work:
- Click a panel to make it the active one. The toolbar acts on the active panel.
- With Sync views on, rotating or zooming one panel moves the other the same way, and a setting you change in the toolbar is applied to both panels.
- With Sync views off, the panels are independent.
- Each panel has a small label in its corner with two buttons. One shows that panel's model in the other panel, the other closes the panel.
Solid next to Normals
- Click Split view.
- Turn Sync views off.
- Click the panel you want to change and choose Normals. The other panel stays in Solid.
- Turn Sync views back on.
Both panels now rotate together, so you can match every odd-colored patch on one side with the real shape on the other. But while sync is on, clicking a view mode switches both panels again.
View next to World
Follow the same steps, but put both panels in Normals and choose World in one of them while sync is off. One panel then shows which faces are flipped, and the other shows how the model is oriented.
Before and after a repair
Add both files to the page: the original and the repaired one. In split view, click a panel and then click a file in the model list to show that file in the panel. With Normals in both panels and sync on, you can turn the two models together and check that the olive patches are gone.
Split view is available in the preview on the home page and on shared model pages. It is not available in embeds, and the layout is not saved in the share link. On a narrow screen the panels are always stacked.
Use Normals with the other tools
The rest of the viewer keeps working in Normals mode:
- Measure snaps to the surface as usual, so you can measure a damaged area.
- Section analysis cuts through the colored model. Hollow mode lets you look at the inner side of the walls.
- Multi-part models are colored part by part. You can still click a part to select it and use the Explode view slider to pull the parts apart.
- Save Image downloads a PNG with the Normals colors. It is a quick way to show a designer exactly where the problem is.
- Material has no visible effect while the mode is on. The material you pick is applied when you go back to Solid.
Share a model in Normals mode
The view mode and both options are saved together with the model when you upload it. If you click Upload while the model is in Normals mode, the share link opens in Normals mode too, with the same normal space and shading. The preview image of the model is taken at that moment as well, so it also shows the Normals colors.
You can also set the mode in the link itself, whatever the model was saved with:
https://stlviewer.online/view/{shareId}?render=normals&normalSpace=world&normalShading=smooth
| Parameter | Values | What it does |
|---|---|---|
render | normals | Opens the model in Normals mode. |
normalSpace | view / world | Normal space. The default is view. |
normalShading | face / smooth | Shading. The default is face. |
The same parameters work in an embed. Add them after ?embed=true:
<iframe src="https://stlviewer.online/view/{shareId}?embed=true&render=normals"
  title="My 3D model" style="width:100%;height:600px;border:0;"
  loading="lazy" allowfullscreen></iframe>
See How to embed a 3D model on your website for the full embedding guide and the embed options reference for every parameter.
What to do when you find flipped faces
STLViewer shows the problem but does not change your file. To fix it, use the program the model came from or a mesh repair tool:
- Export again from CAD. Check that the part is one closed solid, and look closely at anything that was mirrored.
- Blender. In Edit Mode select everything, then choose Mesh → Normals → Recalculate Outside.
- MeshLab. Use Filters → Normals, Curvatures and Orientation → Re-Orient all faces coherently.
- Your slicer. Many slicers have an automatic repair command that fixes simple cases.
Then open the repaired file in STLViewer and check it in Normals mode again. In split view you can put the old and the new file next to each other.
Frequently asked questions
Does the Normals mode fix my model?
No. It only shows which way each surface faces, and it does not change your file. To fix flipped faces, export the model again or use a repair tool such as Blender or MeshLab, then check the result in Normals mode.
I see olive patches. Is my model broken?
Not always. In View space, olive means you are looking at the back of a surface. On a closed solid part that points to a flipped face. But olive is expected when you look through a hole, at a surface with no thickness, into a section cut, or when the camera is inside the model.
Why do the colors change when I rotate the model?
Because the default normal space is View, where direction is measured against your screen. Open Normals options and choose World if you want every surface to keep its color while you rotate.
Why do Face and Smooth look the same?
An STL file stores one normal per triangle, so on a healthy STL both settings give the same picture. They differ when the normals written in the file disagree with the geometry, and on 3MF or PLY models with smooth normals.
Is my file uploaded when I check normals?
No. The model is opened and drawn in your browser. It is sent to the server only if you click Upload to create a share link.